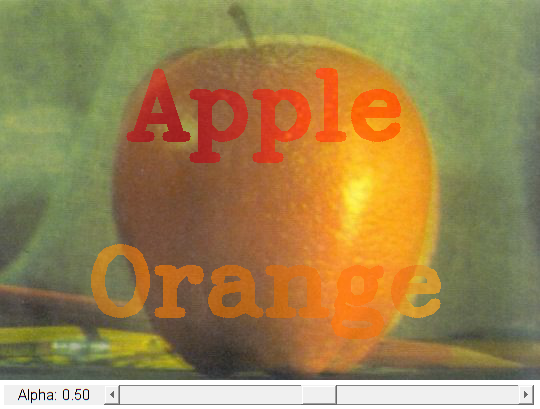
Image Blending
In this demo, we add two images using cv.addWeighted which defines a linear blend operator:
![]()
By varying ![]() from
from ![]() this operator can be used to perform a temporal cross-dissolve between two images or videos.
this operator can be used to perform a temporal cross-dissolve between two images or videos.
Sources:
- https://docs.opencv.org/3.2.0/d5/dc4/tutorial_adding_images.html
- https://docs.opencv.org/3.2.0/da/d6a/tutorial_trackbar.html
- https://docs.opencv.org/3.2.0/d0/d86/tutorial_py_image_arithmetics.html
- https://github.com/opencv/opencv/blob/3.2.0/samples/cpp/tutorial_code/core/AddingImages/AddingImages.cpp
- https://github.com/opencv/opencv/blob/3.2.0/samples/cpp/tutorial_code/HighGUI/AddingImagesTrackbar.cpp
function varargout = linear_blending_demo_gui(im1, im2)
    % load source images
    if nargin < 1
        im1 = fullfile(mexopencv.root(),'test','apple.jpg');
        img1 = cv.imread(im1, 'Color',true);
        img1 = drawText(img1, 'Apple', true, 'Color',[255 0 0]);
    elseif ischar(im1)
        img1 = cv.imread(im1, 'Color',true);
    else
        img1 = im1;
    end
    if nargin < 2
        im2 = fullfile(mexopencv.root(),'test','orange.jpg');
        img2 = cv.imread(im2, 'Color',true);
        img2 = drawText(img2, 'Orange', false, 'Color',[255 128 0]);
    elseif ischar(im2)
        img2 = cv.imread(im2, 'Color',true);
    else
        img2 = im2;
    end
    assert(isequal(size(img1), size(img2)), 'Different image sizes');

    % create the UI
    h = buildGUI(img1, img2);
    if nargout > 0, varargout{1} = h; end
end

function img = drawText(img, str, top, varargin)
    %DRAWTEXT  Helper function to put text on image

    opts = {'FontFace','HersheyComplex', 'FontScale',3, 'Thickness',9};
    txtsz = cv.getTextSize(str, opts{:});
    x = (size(img,2) - txtsz(1)) / 2;
    if top
        y = 2*txtsz(2);
    else
        y = size(img,1) - txtsz(2);
    end
    img = cv.putText(img, str, round([x y]), opts{:}, varargin{:});
end

function onChange(~,~,h)
    %ONCHANGE  Event handler for UI controls

    % retrieve current values from UI controls
    a = get(h.slid, 'Value');
    set(h.txt, 'String',sprintf('Alpha: %.2f',a));

    % image blending
    out = cv.addWeighted(h.src1, a, h.src2, 1-a, 0.0);

    % show result
    set(h.img, 'CData',out);
    drawnow;
end

function h = buildGUI(img1, img2)
    %BUILDGUI  Creates the UI

    % parameters
    a = 0.5;
    sz = size(img1);
    sz(2) = max(sz(2), 300);  % minimum figure width

    % build the user interface (no resizing to keep it simple)
    h = struct();
    h.src1 = img1;
    h.src2 = img2;
    h.fig = figure('Name','Linear Blend Demo', ...
        'NumberTitle','off', 'Menubar','none', 'Resize','off', ...
        'Position',[200 200 sz(2) sz(1)+29]);
    if ~mexopencv.isOctave()
        %HACK: not implemented in Octave
        movegui(h.fig, 'center');
    end
    h.ax = axes('Parent',h.fig, 'Units','pixels', 'Position',[1 30 sz(2) sz(1)]);
    if ~mexopencv.isOctave()
        h.img = imshow(img1, 'Parent',h.ax);
    else
        %HACK: https://savannah.gnu.org/bugs/index.php?45473
        axes(h.ax);
        h.img = imshow(img1);
    end
    h.txt = uicontrol('Parent',h.fig, 'Style','text', 'FontSize',11, ...
        'Position',[5 5 100 20], 'String',sprintf('Alpha: %.2f',a));
    h.slid = uicontrol('Parent',h.fig, 'Style','slider', 'Value',a, ...
        'Min',0, 'Max',1, 'SliderStep',[0.01 0.1]./(1-0), ...
        'Position',[105 5 sz(2)-105-5 20]);

    % hook event handlers, and trigger default start
    set(h.slid, 'Callback',{@onChange,h}, ...
        'Interruptible','off', 'BusyAction','cancel');
    onChange([],[],h);
end
